
Bussystems for the Arduino, ESP32 and other Microcontroller
With a system bus you can connect more sensors than without one, only using one on a pin.
Connect Arduinos over I2C(2019-11-12)
Connect Arduinos over I2C*(2019-11-12)
I2C-Master Sketch(2019-11-12)
```
include
define PAYLOAD_SIZE 2 // how many bytes to expect from each I2C salve node
define NODE_MAX 6 // maximum number of slave nodes (I2C addresses) to probe
define START_NODE 2 // The starting I2C address of slave nodes
define NODEREADDELAY 1000 // Some delay between I2C node reads
int nodePayload[PAYLOAD_SIZE];
void setup()
{
Serial.begin(9600);
Serial.println("MASTER READER NODE");
Serial.print("Maximum Slave Nodes: ");
Serial.println(NODEMAX);
Serial.print("Payload size: ");
Serial.println(PAYLOADSIZE);
Serial.println("***");
Wire.begin(); // Activate I2C link } ```
I2C-Master Sketch(2019-11-12)
`
void loop()
{
for (int nodeAddress = START_NODE; nodeAddress <= NODE_MAX; nodeAddress++) { // we are starting from Node address 2
Wire.requestFrom(nodeAddress, PAYLOAD_SIZE);    // request data from node#
if(Wire.available() == PAYLOAD_SIZE) {  // if data size is avaliable from nodes
for (int i = 0; i < PAYLOAD_SIZE; i++) nodePayload[i] = Wire.read();  // get nodes data
for (int j = 0; j < PAYLOAD_SIZE; j++) Serial.println(nodePayload[j]);   // print nodes data<br />
Serial.println("*************************");<br />
}
}
delay(NODE_READ_DELAY);
}
`
I2C-Slave Sketch(2019-11-12)
```
include
define NODE_ADDRESS 2 // Change this unique address for each I2C slave node
define PAYLOAD_SIZE 2 // Number of bytes expected to be received by the master I2C node
byte nodePayload[PAYLOAD_SIZE];
void setup() {
Serial.begin(9600);
Serial.println("SLAVE SENDER NODE");
Serial.print("Node address: ");
Serial.println(NODEADDRESS);
Serial.print("Payload size: ");
Serial.println(PAYLOADSIZE);
Serial.println("***");
Wire.begin(NODE_ADDRESS); // Activate I2C network Wire.onRequest(requestEvent); // Request attention of master node } ```
I2C-Slave Sketch(2019-11-12)
``` void loop() { delay(100); nodePayload[0] = NODE_ADDRESS; // I am sending Node address back. Replace with any other data nodePayload[1] = analogRead(A0)/4; // Read A0 and fit into 1 byte. Replace this line with your sensor value
}
void requestEvent()
{
Wire.write(nodePayload,PAYLOAD_SIZE);
Serial.print("Sensor value: "); // for debugging purposes.
Serial.println(nodePayload[1]); // for debugging purposes.
}
```
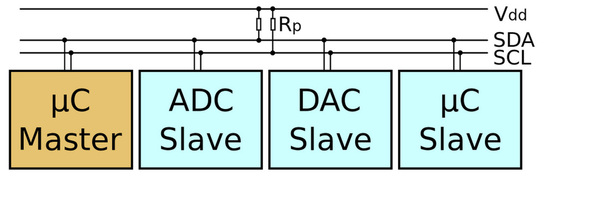
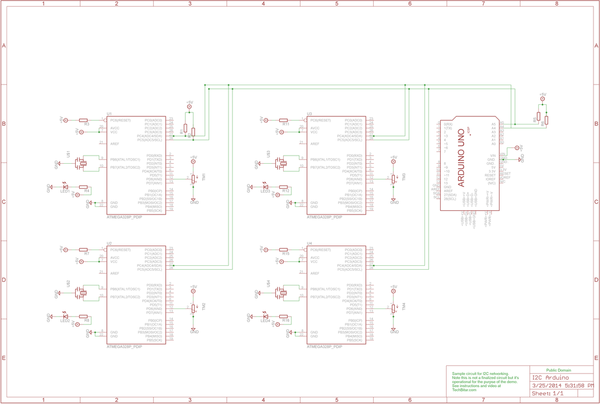
I2C Circuit
- Resistor 10K Ohm X 2: Pull-up resistors for the I2C SDA SCL lines
- LED X 3: It's nice to have these LEDs to know when wire is applied to the microcontroller.
- Resistor 300 Ohm to 1K Ohm X 3: Used in series with the LEDs.
- Use the sensor out of the kit for demonstrating the Network