
Use a button with the arduino
Debounce
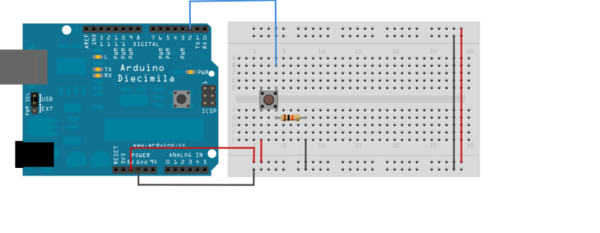
Pushbuttons often generate spurious open/close transitions when pressed, due to mechanical and physical issues: these transitions may be read as multiple presses in a very short time fooling the program. This example demonstrates how to debounce an input, which means checking twice in a short period of time to make sure the pushbutton is definitely pressed. Without debouncing, pressing the button once may cause unpredictable results. This sketch uses the millis() function to keep track of the time passed since the button was pressed.
Use a button with the arduino
- use a 10k ohm resistor
- use the Debounce example from the IDE (Files/exampes/Digital/DEBOUNCE)
- try to use it with extracting a function for debounce from the loop
Use a button with the arduino
Use a LCD-Display with the arduino
- check which display is in the kit, look for the data sheet and use the breadboard
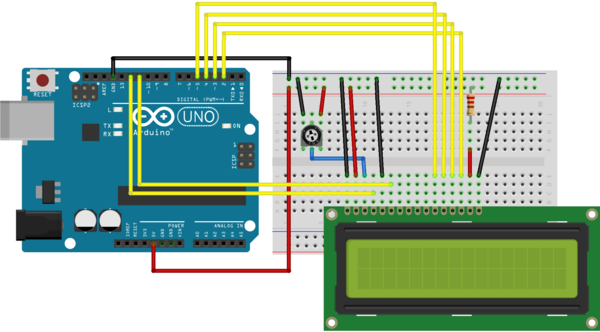
Use the LCD-Display and a few buttons with your motor project
- use the buttons for the directions
- use the button for the speed
- protocol the steps on the display
More Serial sketches
- work with SerialEvent (Files/Examples/Communication/SerialEvent) 1 What is an event and what means that for this example
- How can we use that for our motor sketch?
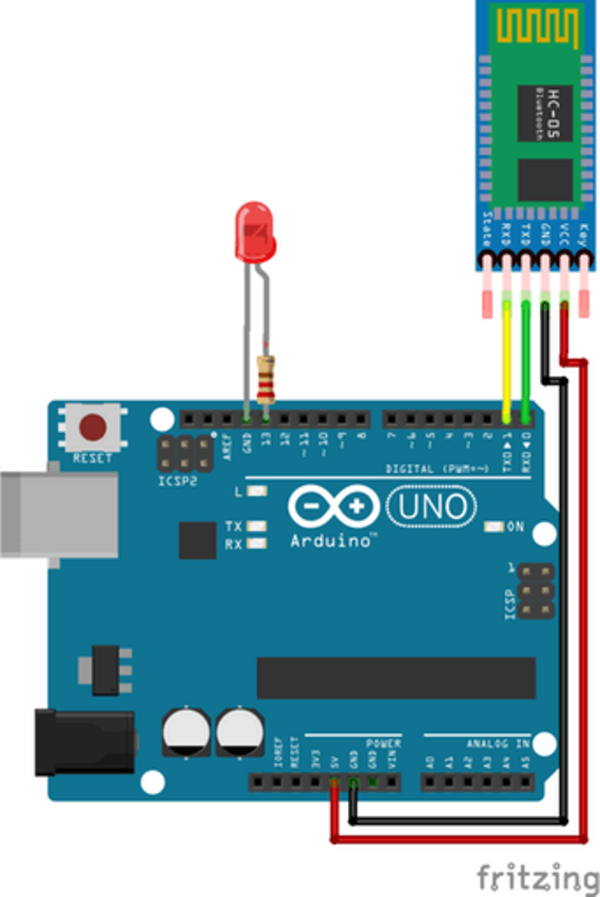
Use Bluetooth with the Arduino(2019-11-12)
- connect Arduino RX to the Bluetooth-modul TX-Pin (TX = Transmit, RX = Receive)
- connect Arduino TX to the Bluetooth-modul RX-Pin
- 5V to VCC
- GND to GND
Use Bluetooth with the Arduino(2019-11-12)
The Bluetooth sketch(2019-11-12)
`
/*
*  Bluetooh Basic: LED ON OFF - Avishkar
*  Coder - Mayoogh Girish
*  Website - http://bit.do/Avishkar
*  Download the App :
*  This program lets you to control a LED on pin 13 of arduino using a bluetooth module
*/
char Incoming_value = 0;                //Variable for storing Incoming_value
void setup()
{
Serial.begin(9600);         //Sets the data rate in bits per second (baud) for serial data transmission
pinMode(13, OUTPUT);        //Sets digital pin 13 as output pin
}
`
Bluetooth sketch LOOP(2019-11-12)
`
void loop()
{
if(Serial.available() > 0)<br />
{
Incoming_value = Serial.read();      //Read the incoming data and store it into variable Incoming_value
Serial.print(Incoming_value);        //Print Value of Incoming_value in Serial monitor
Serial.print("\n");        //New line
if(Incoming_value == '1')            //Checks whether value of Incoming_value is equal to 1
digitalWrite(13, HIGH);  //If value is 1 then LED turns ON
else if(Incoming_value == '0')       //Checks whether value of Incoming_value is equal to 0
digitalWrite(13, LOW);   //If value is 0 then LED turns OFF
}<br />
}<br />
`